
Topics Covered In This Chapter:
- Collision Detection
- Don't Modify a List While Iterating Over It
- Keyboard Input in Pygame
- Mouse Input in Pygame
A very common behavior in most graphical games is collision detection. Collision detection is figuring when two things on the screen have touched (that is, collided with) each other. This is used very often in computer games. For example, if the player touches an enemy they may lose health or a game life. Or we may want to know when the player has touched a coin so that they automatically pick it up. Collision detection can help determine if the game character is standing on solid ground, or if there is nothing but empty air underneath them. In our games, collision detection is determining if two rectangles are overlapping each other or not. Our next example program will cover this basic technique.
Later in this chapter, we will look at how our Pygame programs can accept input from the user through the keyboard and the mouse. It's a bit more complicated than calling the input() function like we did for our text programs. But using the keyboard is much more interactive in GUI programs, and using the mouse isn't even possible in our text games. Knowing these two concepts will make our games more advanced and exciting!
The Collision Detection Program's Source Code
Much of this code is similar to the animation program, so we will skip over explaining how to make the bouncer move and bounce off of the walls. (See the animation program in the previous chapter for an explanation of that code.) We will use a list of pygame.Rect objects to represent the food squares. Each pygame.Rect object in the list represents a single food square. On each iteration through the game loop, our program will read each pygame.Rect object in the list and draw a green square on the window. Every forty iterations through the game loop we will add a new pygame.Rect to the list so that the screen constantly has new food squares in it.
The bouncer is represented by a dictionary. The dictionary has a key named 'rect' (whose value is a pygame.Rect object) and a key named 'dir' (whose value is one of the constant direction variables just like we had in last chapter's Animation program). As the bouncer bounces around the window, we check if it collides with any of the food squares. If it does, we delete that food square so that it will no longer be drawn on the screen.
Type the following into a new file and save it as collisionDetection.py. If you don't want to type all of this code, you can download the source from the book's website at http://inventwithpython.com/chapter18.
collisionDetection.py
This code can be downloaded from http://inventwithpython.com/collisionDetection.py
If you get errors after typing this code in, compare it to the book's code with the online diff tool at http://inventwithpython.com/diff or email the author at al@inventwithpython.com
This code can be downloaded from http://inventwithpython.com/collisionDetection.py
If you get errors after typing this code in, compare it to the book's code with the online diff tool at http://inventwithpython.com/diff or email the author at al@inventwithpython.com
- import pygame, sys, random
- from pygame.locals import *
- def doRectsOverlap(rect1, rect2):
- for a, b in [(rect1, rect2), (rect2, rect1)]:
- # Check if a's corners are inside b
- if ((isPointInsideRect(a.left, a.top, b)) or
- (isPointInsideRect(a.left, a.bottom, b)) or
- (isPointInsideRect(a.right, a.top, b)) or
- (isPointInsideRect(a.right, a.bottom, b))):
- return True
- return False
- def isPointInsideRect(x, y, rect):
- if (x > rect.left) and (x < rect.right) and (y > rect.top) and (y < rect.bottom):
- return True
- else:
- return False
- # set up pygame
- pygame.init()
- mainClock = pygame.time.Clock()
- # set up the window
- WINDOWWIDTH = 400
- WINDOWHEIGHT = 400
- windowSurface = pygame.display.set_mode((WINDOWWIDTH, WINDOWHEIGHT), 0, 32)
- pygame.display.set_caption('Collision Detection')
- # set up direction variables
- DOWNLEFT = 1
- DOWNRIGHT = 3
- UPLEFT = 7
- UPRIGHT = 9
- MOVESPEED = 4
- # set up the colors
- BLACK = (0, 0, 0)
- GREEN = (0, 255, 0)
- WHITE = (255, 255, 255)
- # set up the bouncer and food data structures
- foodCounter = 0
- NEWFOOD = 40
- FOODSIZE = 20
- bouncer = {'rect':pygame.Rect(300, 100, 50, 50), 'dir':UPLEFT}
- foods = []
- for i in range(20):
- foods.append(pygame.Rect(random.randint(0, WINDOWWIDTH - FOODSIZE), random.randint(0, WINDOWHEIGHT - FOODSIZE), FOODSIZE, FOODSIZE))
- # run the game loop
- while True:
- # check for the QUIT event
- for event in pygame.event.get():
- if event.type == QUIT:
- pygame.quit()
- sys.exit()
- foodCounter += 1
- if foodCounter >= NEWFOOD:
- # add new food
- foodCounter = 0
- foods.append(pygame.Rect(random.randint(0, WINDOWWIDTH - FOODSIZE), random.randint(0, WINDOWHEIGHT - FOODSIZE), FOODSIZE, FOODSIZE))
- # draw the black background onto the surface
- windowSurface.fill(BLACK)
- # move the bouncer data structure
- if bouncer['dir'] == DOWNLEFT:
- bouncer['rect'].left -= MOVESPEED
- bouncer['rect'].top += MOVESPEED
- if bouncer['dir'] == DOWNRIGHT:
- bouncer['rect'].left += MOVESPEED
- bouncer['rect'].top += MOVESPEED
- if bouncer['dir'] == UPLEFT:
- bouncer['rect'].left -= MOVESPEED
- bouncer['rect'].top -= MOVESPEED
- if bouncer['dir'] == UPRIGHT:
- bouncer['rect'].left += MOVESPEED
- bouncer['rect'].top -= MOVESPEED
- # check if the bouncer has move out of the window
- if bouncer['rect'].top < 0:
- # bouncer has moved past the top
- if bouncer['dir'] == UPLEFT:
- bouncer['dir'] = DOWNLEFT
- if bouncer['dir'] == UPRIGHT:
- bouncer['dir'] = DOWNRIGHT
- if bouncer['rect'].bottom > WINDOWHEIGHT:
- # bouncer has moved past the bottom
- if bouncer['dir'] == DOWNLEFT:
- bouncer['dir'] = UPLEFT
- if bouncer['dir'] == DOWNRIGHT:
- bouncer['dir'] = UPRIGHT
- if bouncer['rect'].left < 0:
- # bouncer has moved past the left side
- if bouncer['dir'] == DOWNLEFT:
- bouncer['dir'] = DOWNRIGHT
- if bouncer['dir'] == UPLEFT:
- bouncer['dir'] = UPRIGHT
- if bouncer['rect'].right > WINDOWWIDTH:
- # bouncer has moved past the right side
- if bouncer['dir'] == DOWNRIGHT:
- bouncer['dir'] = DOWNLEFT
- if bouncer['dir'] == UPRIGHT:
- bouncer['dir'] = UPLEFT
- # draw the bouncer onto the surface
- pygame.draw.rect(windowSurface, WHITE, bouncer['rect'])
- # check if the bouncer has intersected with any food squares.
- for food in foods[:]:
- if doRectsOverlap(bouncer['rect'], food):
- foods.remove(food)
- # draw the food
- for i in range(len(foods)):
- pygame.draw.rect(windowSurface, GREEN, foods[i])
- # draw the window onto the screen
- pygame.display.update()
- mainClock.tick(40)
When you run this code, this is what the program looks like. The white square (the bouncer) will bounce around the window, and when it collides with the green squares (the food) will disappear from the screen.
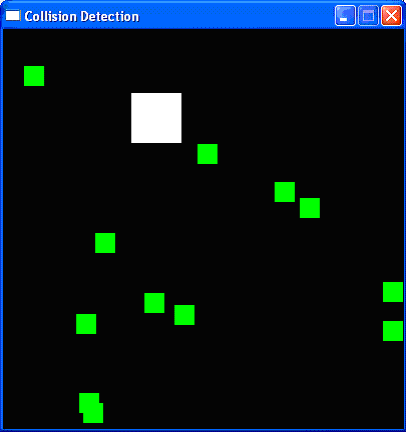
Figure 18-1: The Collision Detection program.
Importing the Modules
- import pygame, sys, random
- from pygame.locals import *
The collision detection program imports the same things as the Animation program in the last chapter, along with the random module.
The Collision Detection Function
- def doRectsOverlap(rect1, rect2):
In order to do collision detection, we will need a function that can determine if two rectangles intersect each other or not. Here is a picture of intersecting rectangles (on the left) and rectangles that do not intersect (on the right):
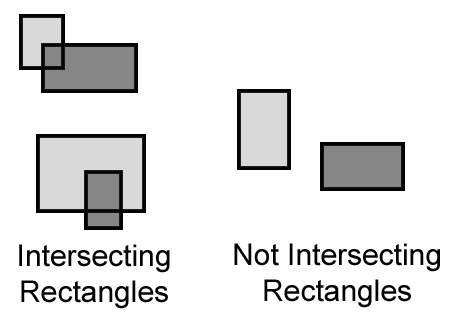
Figure 18-2: Examples of intersecting rectangles (on the left) and rectangles that do not intersect (on the right).
We will make a single function that is passed two pygame.Rect objects. The function, doRectsOverlap(), will return True if they do and False if they don't.
There is a very simple rule we can follow to determine if rectangles intersect (that is, collide). Look at each of the four corners on both rectangles. If at least one of these eight corners is inside the other rectangle, then we know that the two rectangles have collided. We will use this fact to determine if doRectsOverlap() returns True or False.
- for a, b in [(rect1, rect2), (rect2, rect1)]:
- # Check if a's corners are inside b
- if ((isPointInsideRect(a.left, a.top, b)) or
- (isPointInsideRect(a.left, a.bottom, b)) or
- (isPointInsideRect(a.right, a.top, b)) or
- (isPointInsideRect(a.right, a.bottom, b))):
- return True
Above is the code that checks if one rectangle's corners are inside another. Later we will create a function called isPointInsideRect() that returns True if the XY coordinates of the point are inside the rectangle. We call this function for each of the eight corners, and if any of these calls return True, the or operators will make the entire condition True.
The parameters for doRectsOverlap() are rect1 and rect2. We first want to check if rect1's corners are inside rect2 and then check if rect2's corners are in rect1.
We don't want to repeat the code that checks all four corners for both rect1 and rect2, so instead we use a and b on lines 7 to 10. The for loop on line 5 uses the multiple assignment trick so that on the first iteration, a is set to rect1 and b is set to rect2. On the second iteration through the loop, it is the opposite. a is set to rect2 and b is set to rect1.
We do this because then we only have to type the code for the if statement on line 7 once. This is good, because this is a very long if statement. The less code we have to type for our program, the better.
- return False
If we never return True from the previous if statements, then none of the eight corners we checked are in the other rectangle. In that case, the rectangles did not collide and we return False.
Determining if a Point is Inside a Rectangle
- def isPointInsideRect(x, y, rect):
- if (x > rect.left) and (x < rect.right) and (y > rect.top) and (y < rect.bottom):
- return True
The isPointInsideRect() function is used by the doRectsOverlap() function. isPointInsideRect() will return True if the XY coordinates passed to it as the first and second parameters are located "inside" the pygame.Rect object that is passed as the third parameter. Otherwise, this function returns False.
Figure 18-3 is an example picture of a rectangle and several dots. The dots and the corners of the rectangle are labeled with coordinates.
The pattern that points inside a rectangle have is an X-coordinate that is greater than the X-coordinate of the left side and less than the X-coordinate of the right side, and a Y-coordinate that is greater than the Y-coordinate of the top side and less than the Y-coordinate of the bottom side. If any of those conditions are false, then the point is outside the rectangle.
We combine all four of these conditions into the if statement's condition with and operators because all four of the conditions must be True.
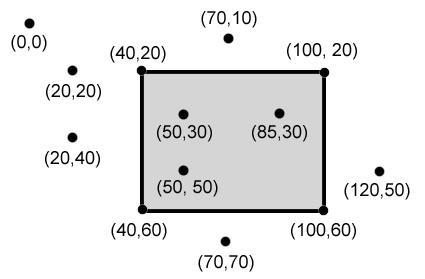
Figure 18-3: Example of coordinates inside and outside
of a rectangle. The (50, 30), (85, 30) and (50, 50) points
are inside the rectangle, and all the others are outside.
- else:
- return False
If just one of the four expressions in the condition on line 16 is False, then we should have isPointInsideRect() return the value False.
This function will be called from the doRectsOverlap() function to see if any of the corners in the two pygame.Rect objects are inside each other. These two functions give us the power to do collision detection between two rectangles.
The pygame.time.Clock Object and tick() Method
Much of lines 22 to 43 do the same thing that Animation program in the last chapter did: initialize the Pygame library, set WINDOWHEIGHT and WINDOWWIDTH, and put together the color and direction constants. However, line 24 is new:
- mainClock = pygame.time.Clock()
In the previous Animation program, we had a call to time.sleep(0.02) inside the game loop in order to slow down the program enough so that we could see the blocks moving. The problem with this is that the program might run too fast on fast computers and too slow on slow computers. We want to limit the maximum number of iterations through the game loop there are per second.
A pygame.time.Clock object can do this for us. You can see on line 125 that we call mainClock.tick(40) inside the game loop. This call to the Clock object's tick() method will check if we have iterated through the game loop more than 40 times in the last second. If so, it puts a short sleep into the program for us based on frequently tick() is being called. This ensures that the game never runs faster than we expect. Be sure to call tick() only once in the game loop.
Setting Up the Window and Data Structures
- pygame.display.set_caption('Collision Detection')
- # set up the bouncer and food data structures
- foodCounter = 0
- NEWFOOD = 40
- FOODSIZE = 20
We are going to set up a few variables for the food blocks that appear on the screen. foodCounter will start at the value 0, NEWFOOD at 40, and FOODSIZE at 20.
- bouncer = {'rect':pygame.Rect(300, 100, 50, 50), 'dir':UPLEFT}
We are going to set up a new data structure called bouncer. bouncer is a dictionary with two keys. The value stored in the 'rect' key will be a pygame.Rect object that represents the bouncer's size and position. The value stored in the 'dir' key will be a direction that the bouncer is currently moving. The bouncer will move the same way the blocks did in our previous animation program: moving in diagonal directions and bouncing off of the sides of the window.
- foods = []
- for i in range(20):
- foods.append(pygame.Rect(random.randint(0, WINDOWWIDTH - FOODSIZE), random.randint(0, WINDOWHEIGHT - FOODSIZE), FOODSIZE, FOODSIZE))
Our program will keep track of every food square with a list of pygame.Rect objects called foods. At the start of the program, we want to create twenty food squares randomly placed around the screen. We can use the random.randint() function to come up with random XY coordinates.
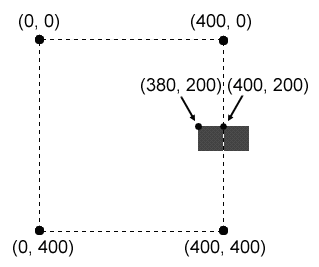 Figure 18-4: For a 20 by 20 rectangle, having the top left corner at (400, 200) in a 400 by 400 window would place the rectangle outside of the window. To be inside, the top left corner should be at (380, 200) instead.
On line 52, we will call the pygame.Rect() constructor function to return a new pygame.Rect object that will represent the position and size of the food square. The first two parameters for pygame.Rect() are the XY coordinates of the top left corner. We want the random coordinate to be between 0 and the size of the window minus the size of the food square. If we had the random coordinate between 0 and the size of the window, then the food square might be pushed outside of the window altogether. For example, look at the diagram in Figure 18-4.
The square on the left has an X-coordinate of its top left corner at 380. Because the food square is 20 pixels wide, the right edge of the food square is at 400. (This is because 380 + 20 = 400.) The square on the right has an X-coordinate of its top left corner at 400. Because the food square is 20 pixels wide, the right edge of the food square is at 420, which puts the entire square outside of the window (and not viewable to the user).
The third parameter for pygame.Rect() is a tuple that contains the width and height of the food square. Both the width and height will be equal to the value in the FOODSIZE constant.
|
Drawing the Bouncer on the Screen
Lines 71 to 109 cause the bouncer to move around the window and bounce off of the edges of the window. This code is very similar to lines 44 to 83 of our animation program in the last chapter, so we will not go over them again here.
- # draw the bouncer onto the surface
- pygame.draw.rect(windowSurface, WHITE, bouncer['rect'])
After moving the bouncer, we now want to draw it on the window in its new position. We call the pygame.draw.rect() function to draw a rectangle. The windowSurface passed for the first parameter tells the computer which pygame.Surface object to draw the rectangle on. The WHITE variable, which has (255, 255, 255) stored in it, will tell the computer to draw a white rectangle. The pygame.Rectobject stored in the bouncer dictionary at the 'rect' key tells the position and size of the rectangle to draw. This is all the information needed to draw a white rectangle on windowSurface.
Remember, we are not done drawing things on the windowSurface object yet. We still need to draw a green square for each food square in the foods list. And we are just "drawing" rectangles on thewindowSurface object, not on the screen. This pygame.Surface object is only inside the computer's memory, which is much faster to modify than the pixels on the screen. The window on the screen will not be updated until we call the pygame.display.update() function.
Colliding with the Food Squares
- # check if the bouncer has intersected with any food squares.
- for food in foods[:]:
Before we draw the food squares, we want to see if the bouncer has overlapped any of the food squares. If it has, we will remove that food square from the foods list. This way, the computer won't draw any food squares that the bouncer has "eaten".
On each iteration through the for loop, the current food square from the foods (plural) list will be stored inside a variable called food (singular).
Don't Add to or Delete from a List while Iterating Over It
Notice that there is something slightly different with this for loop. If you look carefully at line 116, we are not iterating over foods but actually over foods[:]. Just as foods[:2] would return a copy of the list with the items from the start and up to (but not including) the item at index 2, and just as foods[3:] would return a copy of the list with the items from index 3 to the end of the list, foods[:] will give you a copy of the list with the items from the start to the end. Basically, foods[:] creates a new list with a copy of all the items in foods. (This is a shorter way to copy a list than our getBoardCopy() function in the Tic Tac Toe game.)
Why would we want to iterate over a copy of the list instead of the list itself? It is because we cannot add or remove items from a list while we are iterating over it. Python can lose track of what the next value of foodvariable should be if the size of the foods list is always changing. Think of how difficult it would be for you if you tried to count the number of jelly beans in a jar while someone was adding or removing jelly beans. But if we iterate over a copy of the list (and the copy never changes), then adding or removing items from the original list won't be a problem.
Removing the Food Squares
- if doRectsOverlap(bouncer['rect'], food):
- foods.remove(food)
Line 116 is where our doRectsOverlap() function that we defined earlier comes in handy. We pass two pygame.Rect objects to doRectsOverlap(): the bouncer and the current food square. If these two rectangles overlap, then doRectsOverlap() will return True and we will remove the overlapping food squares from foods list.
Drawing the Food Squares on the Screen
- # draw the food
- for i in range(len(foods)):
- pygame.draw.rect(windowSurface, GREEN, foods[i])
The code on lines 120 and 121 are very similar to how we drew the white square for the player. We will loop through each food square in the foods list, and then draw the rectangle onto the windowSurfacesurface. This demonstration of collision detection is fairly easy. This program was very similar to our bouncing program in the previous chapter, except now the bouncing square will "eat" the other squares as it passes over them.
These past few programs are interesting to watch, but the user does not get to actually control anything. In this next program, we will learn how to get input from the keyboard. Keyboard input is handled in Pygame by using events.
The Keyboard Input Program's Source Code
Start a new file and type in the following code, then save it as pygameInput.py.
pygameInput.py
This code can be downloaded from http://inventwithpython.com/pygameInput.py
If you get errors after typing this code in, compare it to the book's code with the online diff tool at http://inventwithpython.com/diff or email the author at al@inventwithpython.com
This code can be downloaded from http://inventwithpython.com/pygameInput.py
If you get errors after typing this code in, compare it to the book's code with the online diff tool at http://inventwithpython.com/diff or email the author at al@inventwithpython.com
- import pygame, sys, random
- from pygame.locals import *
- # set up pygame
- pygame.init()
- mainClock = pygame.time.Clock()
- # set up the window
- WINDOWWIDTH = 400
- WINDOWHEIGHT = 400
- windowSurface = pygame.display.set_mode((WINDOWWIDTH, WINDOWHEIGHT), 0, 32)
- pygame.display.set_caption('Input')
- # set up the colors
- BLACK = (0, 0, 0)
- GREEN = (0, 255, 0)
- WHITE = (255, 255, 255)
- # set up the player and food data structure
- foodCounter = 0
- NEWFOOD = 40
- FOODSIZE = 20
- player = pygame.Rect(300, 100, 50, 50)
- foods = []
- for i in range(20):
- foods.append(pygame.Rect(random.randint(0, WINDOWWIDTH - FOODSIZE), random.randint(0, WINDOWHEIGHT - FOODSIZE), FOODSIZE, FOODSIZE))
- # set up movement variables
- moveLeft = False
- moveRight = False
- moveUp = False
- moveDown = False
- MOVESPEED = 6
- # run the game loop
- while True:
- # check for events
- for event in pygame.event.get():
- if event.type == QUIT:
- pygame.quit()
- sys.exit()
- if event.type == KEYDOWN:
- # change the keyboard variables
- if event.key == K_LEFT or event.key == ord('a'):
- moveRight = False
- moveLeft = True
- if event.key == K_RIGHT or event.key == ord('d'):
- moveLeft = False
- moveRight = True
- if event.key == K_UP or event.key == ord('w'):
- moveDown = False
- moveUp = True
- if event.key == K_DOWN or event.key == ord('s'):
- moveUp = False
- moveDown = True
- if event.type == KEYUP:
- if event.key == K_ESCAPE:
- pygame.quit()
- sys.exit()
- if event.key == K_LEFT or event.key == ord('a'):
- moveLeft = False
- if event.key == K_RIGHT or event.key == ord('d'):
- moveRight = False
- if event.key == K_UP or event.key == ord('w'):
- moveUp = False
- if event.key == K_DOWN or event.key == ord('s'):
- moveDown = False
- if event.key == ord('x'):
- player.top = random.randint(0, WINDOWHEIGHT - player.height)
- player.left = random.randint(0, WINDOWWIDTH - player.width)
- if event.type == MOUSEBUTTONUP:
- foods.append(pygame.Rect(event.pos[0], event.pos[1], FOODSIZE, FOODSIZE))
- foodCounter += 1
- if foodCounter >= NEWFOOD:
- # add new food
- foodCounter = 0
- foods.append(pygame.Rect(random.randint(0, WINDOWWIDTH - FOODSIZE), random.randint(0, WINDOWHEIGHT - FOODSIZE), FOODSIZE, FOODSIZE))
- # draw the black background onto the surface
- windowSurface.fill(BLACK)
- # move the player
- if moveDown and player.bottom < WINDOWHEIGHT:
- player.top += MOVESPEED
- if moveUp and player.top > 0:
- player.top -= MOVESPEED
- if moveLeft and player.left > 0:
- player.left -= MOVESPEED
- if moveRight and player.right < WINDOWWIDTH:
- player.right += MOVESPEED
- # draw the player onto the surface
- pygame.draw.rect(windowSurface, WHITE, player)
- # check if the player has intersected with any food squares.
- for food in foods[:]:
- if player.colliderect(food):
- foods.remove(food)
- # draw the food
- for i in range(len(foods)):
- pygame.draw.rect(windowSurface, GREEN, foods[i])
- # draw the window onto the screen
- pygame.display.update()
- mainClock.tick(40)
This program looks identical to the collision detection program earlier in this chapter. But in this program, the bouncer only moves around when we hold down keys on the keyboard. Holding down the "W" key moves the bouncer up. The "A" key moves the bouncer to the left and the "D" key moves the bouncer to the right. The "S" key moves the bouncer down. You can also move the bouncer by holding down the arrow keys on the keyboard. The user can also use the keyboard's arrow keys.
We can also click anywhere in the GUI window and create new food objects at the coordinates where we clicked. In addition, the ESC key will quit the program and the "X" key will teleport the bouncer to a random place on the screen.
Setting Up the Window and Data Structures
First, we set the caption of the window's title bar to the string to 'Mouse' on line 12. We set the caption of the window with a call to pygame.display.set_caption() the same way as we did in our previous Pygame programs. Next we want to set up some variables that track the movement of the bouncer.
- # set up movement variables
- moveLeft = False
- moveRight = False
- moveUp = False
- moveDown = False
We are going to use four different Boolean variables to keep track of which of the arrow keys are being held down. For example, when the user pushes the left arrow key on her keyboard, we will set the moveLeftvariable to True. When she lets go of the key, we will set the moveLeft variable back to False. The "W" key affects the moveUp variable, the "S" key affects the moveDown variable, and the "D" key affects themoveRight variable in a similar way.
Lines 34 to 43 are identical to code in the previous Pygame programs. These lines handle the start of the game loop and handling what to do when the user wants to quit the program. We will skip the explanation for this code here since we have already covered it in the last chapter.
Events and Handling the KEYDOWN Event
| Event | Description | ||||||||||||
|---|---|---|---|---|---|---|---|---|---|---|---|---|---|
| QUIT | Generated when the user closes with window. | ||||||||||||
| KEYDOWN | Generated when the user pressed down a key. Has a key attribute that tells which key was pressed. Also has a mod attribute that tells if the Shift, Ctrl, Alt, or other keys were held down when this key was pressed. | ||||||||||||
| KEYUP | Generated when the user releases a key. Has a key and modattribute that are similar to those for KEYDOWN. | ||||||||||||
| MOUSEMOTION | Generated whenever the mouse moves over the window. Has apos attribute that returns tuple (x, y) for the coordinates of where the mouse is in the window. The rel attribute also returns a (x, y) tuple, but it gives coordinates relative since the lastMOUSEMOTION event. For example, if the mouse moves left by four pixels from (200, 200) to (196, 200), then rel will be (-4, 0). The buttons attribute returns a tuple of three integers. The first integer in the tuple is for the left mouse button, the second integer for the middle mouse button (if there is a middle mouse button), and the third integer is for the right mouse button. These integers will be 0 if they are not being pressed down when the mouse moved and 1 if they are pressed down. | ||||||||||||
| MOUSEBUTTONDOWN | Generated when a mouse button is pressed down in the window. This event has a pos attribute which is an (x, y) tuple for the coordinates of where the mouse was when the button was pressed. There is also a button attribute which is an integer from 1 to 5that tells which mouse button was pressed:
| ||||||||||||
| MOUSEBUTTONUP | Generated when the mouse button is released. This has the same attributes as MOUSEBUTTONDOWN |
The code to handle the key press and key release events is below. But at the start of the program, we will set all of these variables to False.
- if event.type == KEYDOWN:
Pygame has another event type called KEYDOWN. On line 41, we check if the event.type attribute is equal to the QUIT value to check if we should exit the program. But there are other events that Pygame can generate. A brief list of the events that could be returned by pygame.event.get() is in Table 18-1.
Setting the Four Keyboard Variables
- # change the keyboard variables
- if event.key == K_LEFT or event.key == ord('a'):
- moveRight = False
- moveLeft = True
- if event.key == K_RIGHT or event.key == ord('d'):
- moveLeft = False
- moveRight = True
- if event.key == K_UP or event.key == ord('w'):
- moveDown = False
- moveUp = True
- if event.key == K_DOWN or event.key == ord('s'):
- moveUp = False
- moveDown = True
If the event type is KEYDOWN, then the event object will have a key attribute that will tell us which key was pressed down. On line 46, we can compare this value to K_LEFT, which represents the left arrow key on the keyboard. We will do this for each of the arrow keys: K_LEFT, K_RIGHT, K_UP, K_DOWN.
When one of these keys is pressed down, we will set the corresponding movement variable to True. We will also set the movement variable of the opposite direction to False. For example, the program executes lines 47 and 48 when the left arrow key has been pressed. In this case, we will set moveLeft to True and moveRight to False (even though moveRight might already be False, we set it to False just to be sure).
You may notice that on line 46, in event.key can either be equal to K_LEFT or ord('a'). The value in event.key is set to the integer ASCII value of the key that was pressed on the keyboard. (There is no ASCII value for the arrow keys, which is why we use the constant variable K_LEFT.) You can use the ord() function to get the ASCII value of any single character to compare it with event.key.
By executing the code on lines 47 and 48 if the keystroke was either K_LEFT or ord('a'), we make the left arrow key and the A key do the same thing. You may notice that the W, A, S, and D keys are all used as alternates for changing the movement variables. This is because some people may want to use their left hand to press the WASD keys instead of their right hand to press the arrow keys. Our program offers them both!
Handling the KEYUP Event
- if event.type == KEYUP:
When the user releases the key that they are holding down, a KEYUP event is generated.
- if event.key == K_ESCAPE:
- pygame.quit()
- sys.exit()
If the key that the user released was the Esc key, then we want to terminate the program. Remember, in Pygame you must call the pygame.quit() function before calling the sys.exit() function. We want to do this when the user releases the Esc key, not when they first Esc key down.
Lines 62 to 69 will set a movement variable to False if that direction's key was let go.
- if event.key == K_LEFT or event.key == ord('a'):
- moveLeft = False
- if event.key == K_RIGHT or event.key == ord('d'):
- moveRight = False
- if event.key == K_UP or event.key == ord('w'):
- moveUp = False
- if event.key == K_DOWN or event.key == ord('s'):
- moveDown = False
Teleporting the Player
If the user released one of the keys that moves the player, then we want to set the movement variable that corresponds with the key to False. This will tell the later parts of our program to no longer move the player's square on the screen.
- if event.key == ord('x'):
- player.top = random.randint(0, WINDOWHEIGHT - player.height)
- player.left = random.randint(0, WINDOWWIDTH - player.width)
We will also add teleportation to our game. If the user presses the "X" key, then we will set the position of the user's square to a random place on the window. This will give the user the ability to teleport around the window by pushing the "X" key (though they can't control where they will teleport: it's completely random).
Handling the MOUSEBUTTONUP Event
- if event.type == MOUSEBUTTONUP:
- foods.append(pygame.Rect(event.pos[0], event.pos[1], FOODSIZE, FOODSIZE))
Mouse input is handled by events just like keyboard input is. The MOUSEBUTTONUP event occurs when the user clicks a mouse button somewhere in our window, and releases the mouse button. The pos attribute in the Event object is set to a tuple of two integers for the XY coordinates. On line 75, the X-coordinate is stored in event.pos[0] and the Y-coordinate is stored in event.pos[1]. We will create a new Rectobject to represent a new food and place it where the MOUSEBUTTONUP event occurred. By adding a new Rect object to the foods list, a new food square will be displayed on the screen.
Moving the Bouncer Around the Screen
- # move the player
- if moveDown and player.bottom < WINDOWHEIGHT:
- player.top += MOVESPEED
- if moveUp and player.top > 0:
- player.top -= MOVESPEED
- if moveLeft and player.left > 0:
- player.left -= MOVESPEED
- if moveRight and player.right < WINDOWWIDTH:
- player.right += MOVESPEED
We have set the movement variables (moveDown, moveUp, moveLeft, and moveRight) to True or False depending on what keys the user has pressed. Now we will actually move the player's square (which is represented by the pygame.Rect object stored in player) around by adjusting the XY coordinates of player. If moveDown is set to True (and the bottom of the player's square is not below the bottom edge of the window), then we move the player's square down by adding MOVESPEED to the player's current top attribute. We do the same thing for the other three directions as well.
The colliderect() Method
- # check if the player has intersected with any food squares.
- for food in foods[:]:
- if player.colliderect(food):
- foods.remove(food)
In our previous Collision Detection program, we had our own function to check if one rectangle had collided with another. That function was included in this book so that you could understand how the code behind collision detection works. In this program, we can use the collision detection function that comes with Pygame. The colliderect() method for pygame.Rect objects is passed another pygame.Rect object as an argument and returns True if the two rectangles collide and False if they do not. This is the exact same behavior as the doRectsOverlap() function in our previous Collision Detection program.
- mainClock.tick(40)
The rest of the code is similar to the code in the Input program is similar to the earlier Collision Detection program: draw the food squares and the player squares to the windowSurface surface, occasionally add a new food square at a random location to the foods list, check if the player square has collided with any of the food squares, and call mainClock.tick(40) to make the program run at an appropriate speed.
Summary: Collision Detection and Pygame Input
This chapter introduced the concept of collision detection, which is used in most graphical games. Detecting collisions between two rectangles is easy: we just check if the four corners of either rectangle are within the other rectangle. This is such a common thing to check for that Pygame provides it's own collision detection method named colliderect() for pygame.Rect objects.
The first several games in this book were text-based. The program output was text printed to the screen and the input was text typed by the user on the keyboard. But GUI programs can accept keyboard and mouse inputs. Furthermore, GUI programs can respond to single keystrokes when the user pushes down or lets up a single key. The user does not have to type in an entire response and press Enter. This allows for immediate feedback when the player presses down any key on the keyboard and much more interactive games.
The Pygame programs we shown so far have drawn rectangles, lines, circles, and even individual pixels to the screen. These are called drawing primitives. But we also want to use pictures and images instead of simple drawing primitives. The next chapter will tell you how to load images and draw them on the screen. We will also learn how to play sounds and music for the player to hear.


0 comments:
Post a Comment